
If you work in surface science, thin-film deposition, or any ultra-high-vacuum (UHV) experiment, you already know the pain: find a positioning stage that works, doesn’t outgas, and doesn’t break the budget.
How to choose a manual linear stage for high-vacuum laboratory environments? That’s a question we hear almost every week from researchers setting up new chambers or upgrading old hardware. With over 9 years of manufacturing manual and motorized positioning platforms, we’ve helped dozens of labs solve exactly this puzzle.
In this guide, I’ll walk you through what matters — materials, lubrication, vacuum levels, travel, load, and the always-present debate: manual vs motorized vacuum linear stages. No fluff, just practical insight that we’ve gathered from real projects, including multiple UHV thin film deposition sample positioning stages builds.
Let’s start with the real reason you’re reading this: you need a vacuum compatible linear stage that won’t ruin your base pressure, and you probably want a manual vacuum stage because it’s simple, clean, and predictable.
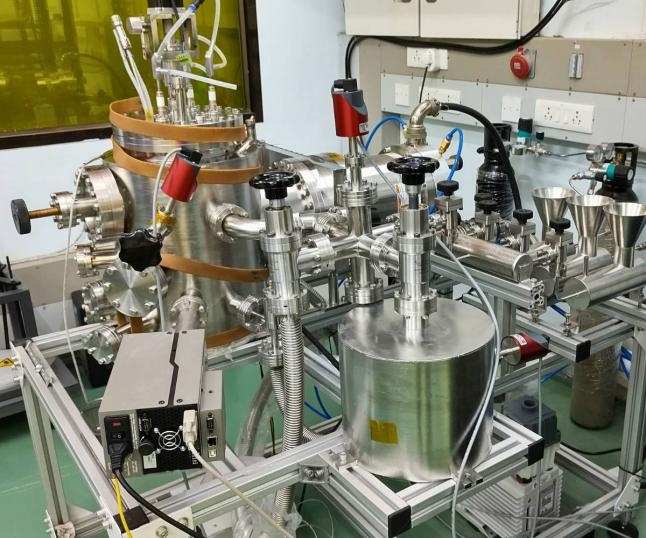
Figure 1: A typical UHV multi-target DC magnetron sputtering system — exactly the kind of chamber where manual positioning stages live inside.
Why a Manual Stage First? Stop Over-Engineering
Before someone tells you to automate everything, ask: “Do I really need a motor in my vacuum chamber?”
In many labs, the answer is no.
A high-quality manual vacuum stage often makes more sense — especially in UHV, where every additional component is a potential leak source or a new outgassing surface.
We’ve supplied manual positioning platforms for:
Sample alignment in UHV deposition systems
Mirror and grating positioning in synchrotron beamlines
Probe and detector positioning in scanning microscopy
Mask alignment stages in e-beam lithography chambers
Manual stages don’t generate heat. They don’t need cables, vacuum feedthroughs for signals, or complex control electronics. If you only adjust your sample once before pumping down, a manual stage is often the cleanest and most cost-effective option.
That said, there are places where motorized stages shine. We’ll compare them properly later.
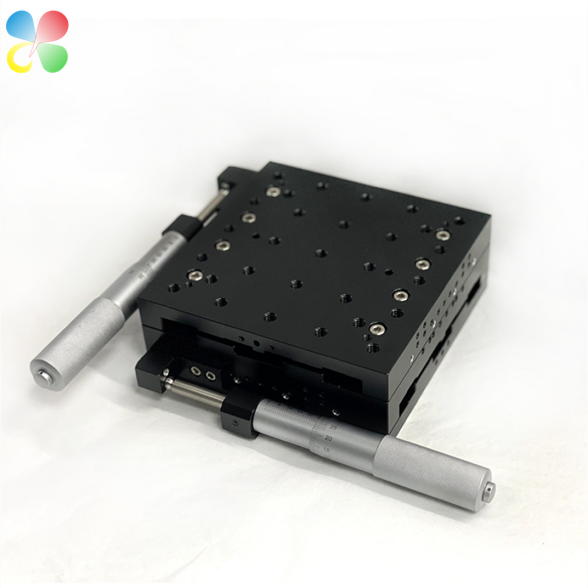
Figure 2: A standard two-axis manual linear stage with crossed-roller bearings and micrometer heads — the workhorse design used in many HV/UHV setups.
Understanding Vacuum Levels and Why They Change Everything
Not all vacuum is the same.
One big mistake we see is using a stage rated for “vacuum” in a real UHV environment without checking the pressure range.
Here’s a quick reference table we share with our customers:
| Vacuum level | Pressure range (mbar) | Common applications | Suitable stage type |
| Low vacuum | 10³ – 1 | Drying, packaging | Standard anodized aluminum |
| Medium vacuum | 1 – 10⁻³ | Rough pumping lines | Cleaned aluminum, basic dry lube |
| High vacuum (HV) | 10⁻³ – 10⁻⁹ | SEM, sputtering, CVD | Vacuum-grade materials, low-outgassing |
| Ultra-high vacuum (UHV) | < 10⁻⁹ | MBE, STM, surface science | Strict material control, bakeable |
When you move into UHV territory — say 5×10⁻¹⁰ mbar — everything changes.
At these pressures, residual gas molecules stick around for hours on surfaces. Even small amounts of hydrocarbons from a wrong lubricant can raise your base pressure and ruin an experiment.
That’s exactly why UHV positioning components are not just “vacuum lubricated.” They’re built from a carefully chosen material set and designed to survive baking at 150°C to 200°C.
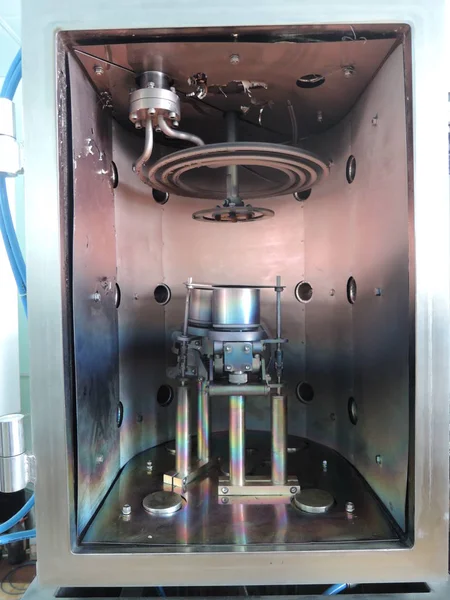
Figure 3: Interior of a stainless steel sputtering chamber. Every metal surface, screw, and moving part inside must be vacuum-compatible — no shortcuts.
Materials: What Actually Works in a Vacuum Compatible Linear Stage
If you remember only one thing from this post, remember this: avoid zinc, cadmium, and standard greases.
For any vacuum compatible linear stage, the body material matters a lot. Here’s what we use in our manual vacuum stages, based on the vacuum class:
Stainless steel (304 or 316L)
The gold standard for UHV. Low outgassing, excellent for baking up to 200°C or higher. Its downside? Higher cost and heavier weight.
Aluminum 6061-T6
Good for HV and some low-end UHV applications when properly cleaned and hard-anodized or left uncoated. Lighter than steel. We often recommend it for manual vacuum stage builds where weight matters and the vacuum is in the 10⁻⁸ mbar range.
Titanium
Excellent for UHV, lightweight, strong. Very expensive and typically only used for special UHV positioning components that need both low mass and extreme vacuum compatibility.
Copper and beryllium copper
Used for some flexure-based designs and electrical contacts, but rarely for stage bodies.
What to avoid
Brass, regular bronze (high zinc), standard plastics, and any alloy with unknown fillers. Even small amounts of volatile elements can kill a UHV experiment. We’ve seen zinc from a brass thumbscrew spike base pressure by a factor of 10.
Outgassing rates matter. Here are some typical values after a vacuum bake:
| Material | Typical outgassing rate (Torr·L/s·cm²) |
| Stainless steel 304, baked | 5×10⁻¹² |
| Aluminum 6061, baked | 1×10⁻¹¹ |
| PTFE (avoid in UHV) | 10⁻⁶ to 10⁻⁷ |
| Viton (FKM), baked | 5×10⁻¹⁰ |
If you’re specifying UHV thin film deposition sample positioning stages, stick to stainless steel or 6061 aluminum, properly cleaned and baked.
Lubrication: Dry Is the Way
Standard bearing grease outgasses like crazy under vacuum. In a high-vacuum or UHV environment, you need dry lubrication.
Common vacuum lubricants for a manual vacuum stage:
MoS₂ (molybdenum disulfide) – works well up to UHV, bakeable
WS₂ (tungsten disulfide) – higher temperature tolerance than MoS₂, excellent for UHV
PTFE-based dry films – use with caution; PTFE itself can be problematic in UHV due to creep and outgassing of trapped volatiles
Graphite – sometimes used in HV but can create conductive dust
Our standard vacuum compatible linear stage drives use MoS₂ or WS₂ coated screws and crossed-roller guides. No wet lubricants. If your stage smells like oil, it’s probably not UHV-ready.
A quick tip: always ask the supplier what lube they use and whether the stage has been vacuum cleaned or baked before shipping. We provide certificates that detail the cleaning process for every UHV positioning components order.
Manual vs Motorized Vacuum Linear Stages: Let’s Compare Real Numbers
The eternal question: manual vs motorized vacuum linear stages. This isn’t just about personal preference. It’s about heat, cost, and complexity.
I’ve put together a table based on what we’ve quoted and delivered to labs over the last few years.
| Feature | Manual vacuum stage | Motorized vacuum stage |
| Heat generation | None | Motor coil heat; may need cooling |
| Vacuum compatibility | UHV easy, fewer parts | Requires vacuum-rated motor, cables |
| Typical cost (single axis) | $400 – $2,800 | $2,500 – $12,000+ |
| Maintenance | Very low | Motor and encoder may need replacement |
| Control complexity | None, direct knob | Controller, software, vacuum feedthroughs |
| Positioning sensitivity | 10 µm to 0.5 µm typical | Sub-µm possible with closed loop |
| Automation capability | No | Yes, including scripting |
| Bakeable version available | Yes, up to 200°C common | Limited, often < 120°C |
| Outgassing risk | Very low | Higher due to insulation and wires |
For most UHV thin film deposition sample positioning stages, we’ve found that a two-axis manual XY stage does the job beautifully. The user adjusts the sample relative to the target before pump-down, and that’s it. There’s no need for remote control during a 30-minute deposition.
Motorized stages become essential when:
You need to scan during the process (e.g., uniformity mapping)
The adjustment point is inside a radiation enclosure
The sample needs realignment without venting
You want to automate multi-sample runs over hours
If you are on the fence, start with a manual vacuum stage. It’s cheaper, easier to integrate, and you can always upgrade later.
How to Choose a Manual Linear Stage for High-Vacuum Laboratory Environments — Step by Step
Let’s get down to a checklist. Use this when you evaluate any vacuum compatible linear stage.
1. Define your vacuum level
Are you working at HV, UHV, or just rough vacuum? This decides material and lubrication.
2. Travel range
For sample positioning in UHV, 13 mm, 25 mm, and 50 mm are the most common travel lengths we ship. Don’t oversize — longer travel usually means a larger stage, more surface area, and more outgassing.
3. Load capacity
Check both horizontal and vertical loads. A stage rated for 5 kg horizontally might hold only 1 kg vertically. Always ask for dynamic load ratings if you plan to move under vacuum.
4. Drive type
Micrometer heads are great for sensitive adjustment (0.01 mm per division). Fine-pitch screws work well for coarser positioning. Differential micrometers give sub-micron sensitivity, which matters in some UHV positioning components for optics.
5. Locking mechanism
Vacuum stages without locks can drift due to small vibrations. Look for a positive locking mechanism or a stiff drive that doesn’t back-drive.
6. Mounting interface
Metric or imperial? Bolted from top or bottom? Can you access the mounting holes inside the chamber? We often supply manual vacuum stage designs with both M6 and 1/4-20 mounting patterns to fit existing optical tables and vacuum hardware.
7. Bakeout temperature
UHV systems get baked at 120°C to 200°C for days. Your stage must survive this without losing its preload or degrading the lubricant. Ask the manufacturer for a bakeout temperature rating. Our standard UHV stages are rated for 150°C continuous, with a 200°C option.
8. Cleaning and packaging
Never accept a stage that hasn’t been vacuum-cleaned or bagged in a cleanroom. Fingerprints are a real source of outgassing.
UHV Thin Film Deposition Sample Positioning Stages — A Look at a Real Build
Last year, a university thin-film lab contacted us. They were building a new UHV sputtering chamber for oxide heterostructures. The target? A base pressure below 2×10⁻¹⁰ mbar after bakeout. They needed UHV thin film deposition sample positioning stages to hold a 2-inch wafer and position it relative to three magnetron guns.
What they needed:
*XY manual positioning with 25 mm travel in each axis
*Load: 1.5 kg wafer holder + heater assembly
*Bakeable to 150°C
*All-stainless-steel construction
*Lockable axes to prevent drift during 3-hour depositions
*Compact design to fit inside a 6-inch flange tube
We provided a custom manual vacuum stage built on a crossed-roller slide, with MoS₂ lubricated fine-pitch screws and positive friction locks. The stage was pre-baked and helium leak-tested before shipping. After integrating it into their chamber, they reached 8×10⁻¹¹ mbar — better than their spec.
This is exactly the type of application where UHV positioning components need to be more than just “vacuum-rated.” They need to be part of the vacuum quality itself.
Avoid These Common Mistakes
I want to save you some trouble. Here are errors we frequently see when labs buy a vacuum compatible linear stage for the first time.
Using standard micrometers
Standard micrometer spindles are often greased and have plastic parts. They outgas badly. Always use vacuum-rated micrometer heads.
Ignoring virtual leaks
Screws in blind holes create trapped gas pockets. We use vented screws or through-holes with side-exit paths. Ask your supplier about this.
Mixing metals
Don’t assume all aluminum is the same. Some 7075 aluminum contains zinc and should be avoided in UHV. Know your alloy.
Forgetting about thermal expansion
During bakeout, stainless steel stages expand differently than aluminum vacuum chambers. If you hard-bolt everything, you can warp the stage. We recommend flexible mounting or matched materials.
No bakeout plan
Even the best manual vacuum stage retains some water vapor from the atmosphere. Always plan a chamber bakeout, and ensure the stage can survive it.
When You Need Help — Ask Us
We’ve spent over 9 years making precision manual and motorized stages. Whether you need a standard vacuum compatible linear stage or a fully custom set of UHV positioning components, we’ve probably built something similar before.
If you’re unsure which manual vacuum stage fits your chamber geometry or vacuum spec, let’s talk. Tell us:
Your base pressure target
Travel and load requirements
Material preferences
Baking temperature and duration
Any space constraints
We’ll propose a solution within 24 hours and can supply 3D CAD files so you can check the fit before ordering.
You can also request a quote directly on our website or email our engineering team. We ship worldwide and provide full cleaning certificates with every vacuum order.
Quick FAQ: Manual Vacuum Stages
Can a manual stage really reach UHV?
Yes. Many of our manual vacuum stage models operate successfully in systems below 5×10⁻¹¹ mbar after proper bakeout. The key is material choice, dry lubrication, and vented hardware.
What’s the minimum motion increment I can achieve?
With a standard micrometer drive, you can adjust by 10 µm easily. With a differential micrometer and a stiff stage, sub-micron steps are possible — even in a manual design.
How do I couple an external knob to a manual stage inside vacuum?
You typically use a rotary vacuum feedthrough with a bellows or magnetic coupling, connected to the stage lead screw. We can provide shaft adapters and mounts that make this straightforward.
Are manual stages cheaper than motorized?
Yes. A good manual vacuum stage costs between 1/5 and 1/3 of an equivalent motorized stage, and you avoid the cost of controllers and feedthroughs. This is why in the manual vs motorized vacuum linear stages debate, budget-conscious labs often start manual.
Do you offer multi-axis assemblies?
We build XY, XYZ, and even custom 4-axis configurations for vacuum. Just let us know your application — whether it’s UHV thin film deposition sample positioning stages or something else.
Wrapping Up
Choosing the right vacuum compatible linear stage doesn’t have to be complicated. Start with your vacuum level, define your motion needs, and don’t over-specify. A well-made manual vacuum stage will serve you for years in HV and UHV without adding heat, complexity, or contamination.
Whether you need off-the-shelf UHV positioning components or a specialized build for UHV thin film deposition sample positioning stages, we’re here to help. Let’s get your experiment moving — cleanly and precisely
Post time: Jul-03-2026


